Define the indicator
In this section we describe the Composite Drought Indicator as a provenance chain: a machine-readable record of which observations were used and how the indicator was derived from them.
An informal description — a comment in a spreadsheet, a paragraph in a report — conveys meaning to a human reader but is opaque to a machine. A provenance chain written against a shared standard is different: it can be validated automatically, transformed into RDF, and interpreted unambiguously by any system that understands the same standard. This is what makes it possible to embed the indicator's meaning in the data, rather than leaving it to be inferred from documentation.
Rather than inventing our own format, we use an OGC Block that provides a schema, validation rules, and a JSON-LD context ready to use.
The Provenance Chain OGC Block
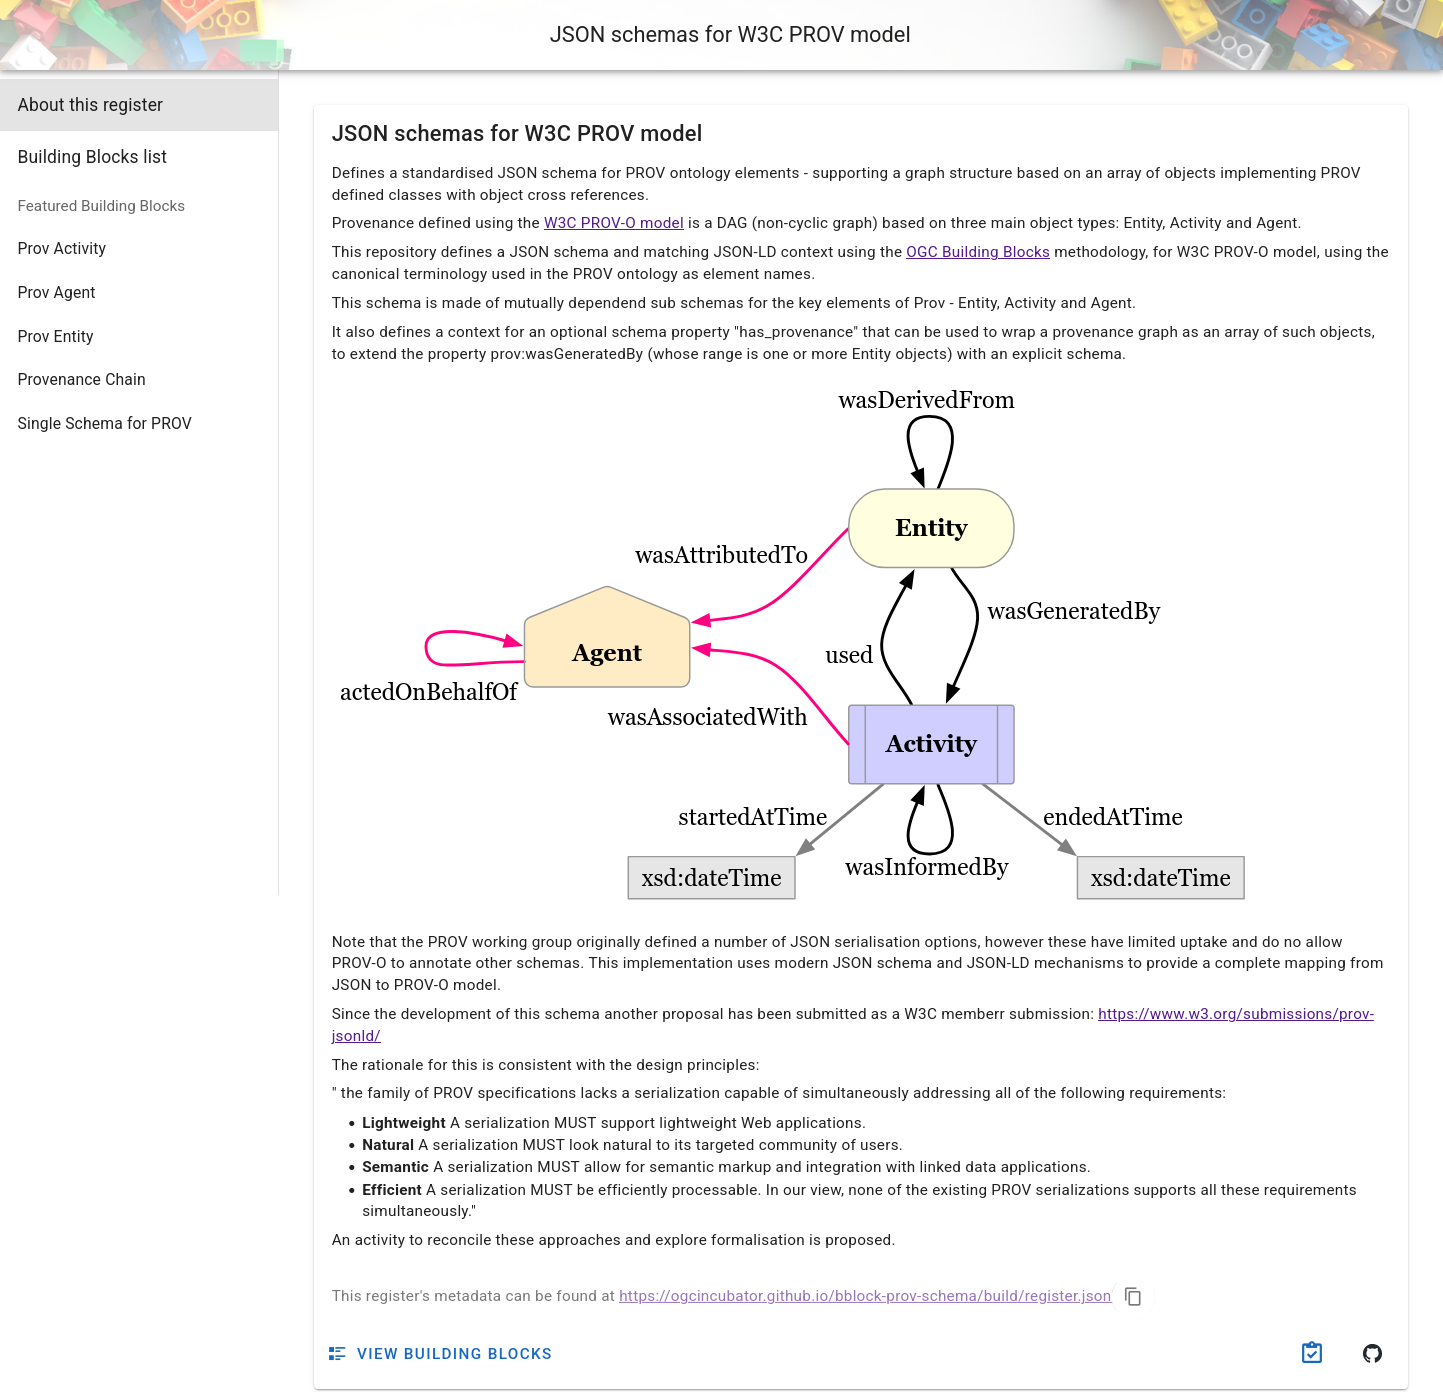
OGC Blocks are reusable specification components that provide a schema, JSON-LD context, and validation rules for a given data structure. We will use the Provenance Chain OGC Block, which is based on the W3C PROV-O ontology and extends it for geospatial use.
The register for the provenance schemas is available at https://ogcincubator.github.io/bblock-prov-schema/ .
Out of the different available Blocks, we will use the "Provenance Chain" one, which is very flexible since it allows us to define a provenance chain starting from an entity, an activity or an agent.
The JSON Schema tab shows the full (semantically annotated) JSON Schema. You can find examples to get started under Examples; the full provenance chain example illustrates many of the available properties.

Writing the provenance chain
Create a file called cdi-indicator.json. The document describes:
- The indicator entity (the CDI value itself)
- The computation activity that generated it
- The three input entities (observations) that the activity used
{
  "id": "indicators/cdi",
  "type": "CompositeIndicator",
  "provType": "Entity",
  "name": "Composite Drought Indicator",
  "wasGeneratedBy": {
    "id": "act/cdi-computation",
    "activityType": "CompositeIndicatorComputation",
    "name": "CDI computation",
    "used": [
      {
        "id": "obs/soil-moisture-anomaly",
        "type": "ObservedProperty",
        "name": "Soil Moisture Anomaly"
      },
      {
        "id": "obs/rainfall-anomaly",
        "type": "ObservedProperty",
        "name": "Rainfall Anomaly"
      },
      {
        "id": "obs/vegetation-condition-anomaly",
        "type": "ObservedProperty",
        "name": "Vegetation Condition Anomaly"
      }
    ]
  }
}
Let's walk through the structure:
id — a relative identifier for the indicator. During semantic uplift (see
below), this will be resolved against a base URI to produce the full linked data
URI for this resource.
type / provType — provType: "Entity" explicitly declares that the
root-level element is a PROV-O Entity. type carries the specific semantic type of the
entity.
In a real-world situation, the type values used here (CompositeIndicator,
ObservedProperty) would be globally defined terms — either full URIs (e.g.
https://example.org/vocab#CompositeIndicator) or JSON-LD terms mapped to URIs
in a shared vocabulary. RDF only carries meaning for terms it can resolve to a
URI; since the strings used here are plain labels with no such mapping, they
will not appear in the output RDF graph. For this tutorial that is intentional:
the structure and provenance relationships are what matter, and those are fully
captured by the standard PROV-O terms (wasGeneratedBy, used, etc.).
wasGeneratedBy — a PROV-O property linking the output entity to the
activity that produced it. Inside this block we describe the computation:
activityTypeidentifies the kind of computation performed.usedlists the input entities that the activity consumed (in our case, the three observations).
Validating and uplifting with bblocks-client-python
The bblocks-client-python library does two things:
- Validates the document against the OGC Block's JSON Schema, catching structural errors before the data goes anywhere.
- Semantically uplifts it: applies the Block's JSON-LD context to the
document, turning the plain JSON property names into fully qualified RDF
URIs. For example,
wasGeneratedBybecomesprov:wasGeneratedBy, andusedbecomesprov:used. The result is a proper RDF graph that Fuseki can store and SPARQL can query.
Before installing anything, create a virtual environment. A virtual environment is an isolated Python installation for your project, which keeps its dependencies separate from the rest of your system. This prevents version conflicts between projects and makes it easy to clean up afterwards.
python -m venv .venv
Then activate it:
# macOS / Linux
source .venv/bin/activate

# Windows (PowerShell)
.venv\Scripts\Activate.ps1
Your terminal prompt will change to show (.venv), indicating the environment
is active. All pip install commands from this point on will install into the
virtual environment only.
Install the library with RDF support (as well as requests for HTTP queries):
pip install "bblocks_client[all] requests"
Then run the following script:
from ogc.bblocks.register import load_register
from ogc.bblocks.validate import validate_json
from ogc.bblocks.semantic_uplift import uplift_json
import json

# Load the provenance chain block
register = load_register(
    "https://ogcincubator.github.io/bblock-prov-schema/build/register.json"
)
bblock = register.get_item_full("ogc.ogc-utils.prov")

# Read the indicator document
with open("cdi-indicator.json") as f:
    indicator = json.load(f)

# Validate against the schema
result = validate_json(bblock, indicator)
result.raise_for_invalid()  # raises an exception if validation fails
print("Validation passed!")

# Uplift: apply JSON-LD context to produce an RDF graph.
# base_uri must match the URI prefix configured in the nginx-ld REDIRECTS
# in Section 1, so that the resource IDs resolve to the correct URLs.
rdf_graph = uplift_json(bblock, indicator, base_uri='https://example.com/rainbow/')

# Serialize as Turtle for upload to Fuseki
rdf_graph.serialize('cdi-indicator.ttl')

print("Uplift complete → cdi-indicator.ttl")
The base_uri argument is important: it is prepended to the relative id
values in the document to produce absolute URIs. For example, the indicator's
id of indicators/cdi/station-alpha/2024-07 becomes
https://example.com/rainbow/indicators/cdi/station-alpha/2024-07. This must
match the URI prefix you configured in the nginx-ld REDIRECTS variable in
Section 1, so that the resource URI and its local URL are consistent.
The script above uses https://example.com/rainbow/ as the base_uri, which
is a placeholder for the domain where the service will eventually be publicly
hosted. For local testing, these URIs do not resolve on their own — they only
work because nginx-ld maps them to your local instance. If you try to open a
https://example.com/rainbow/... URI directly in a browser, it will not
connect to your local service. Use the http://localhost:8080/rainbow/...
equivalent instead, as described in Section 3.
If validation passes and cdi-indicator.ttl is created, you are ready to
upload the data.
Summary
You now have a validated, semantically uplifted Turtle file that describes the Composite Drought Indicator and its provenance chain as an RDF graph.